Acer R241Y User Manual

Browse online or download User Manual for Unknown Acer R241Y. Acer R241Y Quick Start Guide [bg]

  • Download
  • Add to my manuals
  • Print
  • Page
    / 2
  • Table of contents
  • BOOKMARKS
  • Rated. / 5. Based on customer reviews
Page view 0
English
Acer LCD Monitor Quick Start Guide (QSG)
Important safety instructions
Please read the following instructions carefully.
1 To clean the LCD monitor screen:
• Turn off the LCD monitor and unplug the power cord.
• Spray a non-solvent cleaning solution onto a rag and clean the screen gently.
2 Do not place the LCD monitor near a window. Exposing the monitor to rain, moisture or sunlight can severely damage it.
3 Do not apply pressure to the LCD screen. Excessive pressure may cause permanent damage to the display.
4 Do not remove the cover or attempt to service this unit yourself. An authorized technician should perform servicing of
any nature.
5 Store the LCD monitor in a room with a temperature of -20° to 60° C (-4° to140° F). Storing the LCD monitor outside this
range may result in permanent damage.
6 Immediately unplug your monitor and call an authorized technician if any of the following circumstances occur:
• Monitor-to-PC signal cable is frayed or damaged.
• Liquid spills onto the LCD monitor or the monitor is exposed to rain.
• The LCD monitor or case is damaged.
Package contents
LCD
monitor
Quick start
guide
VGA
cable
AC
Adapter
AC Power
cord
HDMI cable
(Optional)
DVI cable
(Optional)
Audio cable
(Optional)
Adjusting the monitor base
1 Carefully remove the monitor from its packaging.
• The monitor base is attached onto the monitor before shipment and it is undetachable.
2 Pull the monitor base out fully so that the monitor can be placed on a stable surface in the upright position.
3
Secure the monitor base by turning the white screws (at the bottom of the base) using the integrated tab or a suitable coin.
Connecting your monitor to a computer
1 Turn off your computer and unplug your computer’s power cord.
2 Connect the signal cable to the VGA and/or DVI-D (optional) and/or
HDMI input socket of the monitor, and the VGA and/or DVI-D (optional)
and/or HDMI output socket of the graphics card on the computer.Then
tighten the thumbscrews on the signal cable connector.
3 Connect one end of the adapter to the monitor and the other end to a
properly grounded, AC outlet.
4 Plug the power cords of your computer and your monitor into a nearby
electrical outlet.
5 Connect the audio cable (Optional).
Connect an audio cable to the audio port of the monitor.
Panel controls
No. Item Description
1 Power button/
indicator
Turns the monitor on/off. Blue indicates power
on. Blinking blue indicates standby/power saving
mode.
2
<
/
>
button Press the
<
/
>
button to navigate to the desired
function or to change the settings of the current
function.
3 Menu/Enter
button
Press to view the OSD menu. Press it again to
enter a selection in the OSD menu.
4 Auto/Exit button • When the OSD menu is active, press this
button to exit the OSD menu.
• When the OSD menu is inactive, press
this button to activate the Auto Adjustment
function.
5 Empowering
Key
Press this button to open the Acer eColor
Management OSD and access the scenario modes.
Note: Audio output is only for audio output model. Please check user
manual for more instruction.
Page view 0
1 2

Summary of Contents

Page 1 - Panel controls

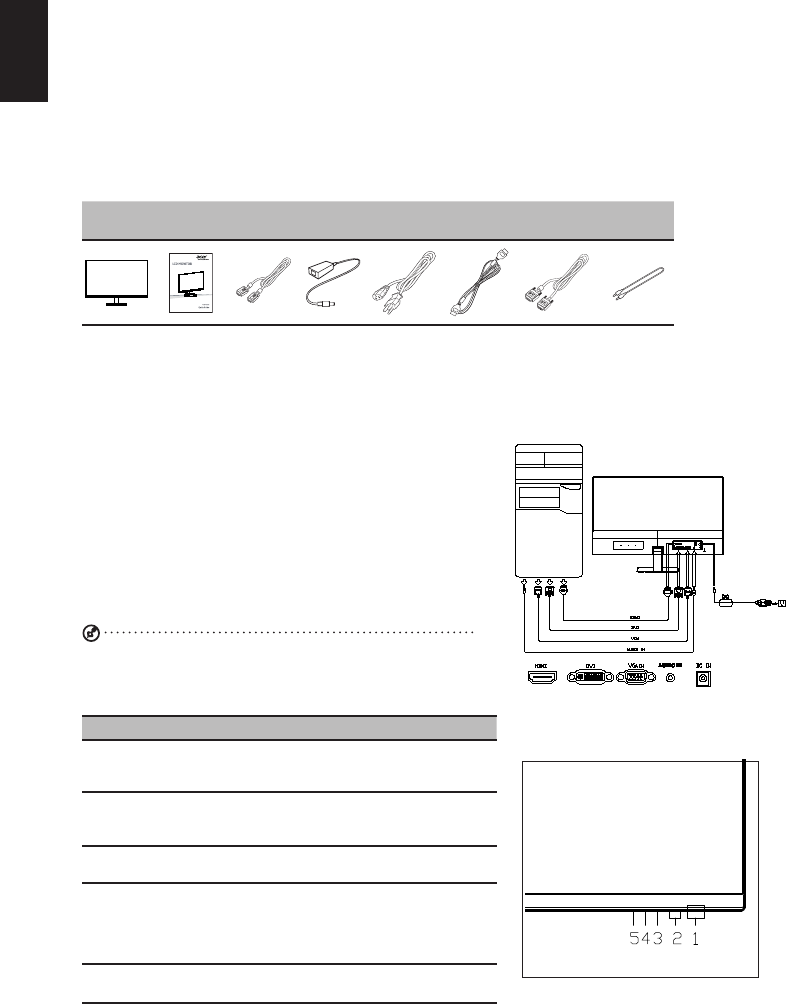
EnglishAcer LCD Monitor Quick Start Guide (QSG)Important safety instructionsPlease read the following instructions carefully.1 To clean the LCD mo

Page 2

EnglishRegulations and safety noticesFCC noticesThis device has been tested and found to comply with the limits for a Class B digital device pursuant

Comments to this Manuals

No comments